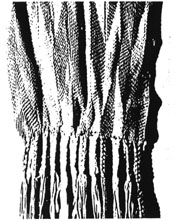
Ojibwa chevron sash of several bands woven together. Photo courtesy Mllwaukee Public Museum.
| Part 1 by Richard Conn (1976)
in 19th Century Seminole Men`s Clothing
|
|
Ojibwa chevron sash of several bands woven together. Photo courtesy Mllwaukee Public Museum.
| Part 1 by Richard Conn (1976)
in 19th Century Seminole Men`s Clothing
|
 |
| Fig. 1 Two finger-woven sashes Winnebago (left) and Menomini (right). Both designs are variations of the basic technique. Photo courtesy of the Museum of the American Indian. |
Some years ago, I began a aeries of articles
in "American Indian Tradition" on the various kinds
of braided sashes. Unfortunately, this magazine went out of business
after the first article was published, and the others were never
printed. In the time since, people have written to ask for instructions
on the material that was to be covered in the unpublished articles.
So far I have had to disappoint them. Now, "American Indian
Crafts 6 Culture" has made it possible to start again and,
hopefully to finish Let's hope this series doesn't prove a jinx
to Mr. Stewart. This first article will cover the basic details
- how to calculate the amount of yarn, how to arrange it, etc.
- and the simple chevron pattern. The next will be concerned with
arrow pattern and the process of braiding several bands simultaneously.
The final article will explain the flame and reflex patterns and
some ways of treating fringe.
The first step in making a piece of finger
weaving is, obviously to figure out your pattern and then plan
how much yarn you will aced. I except you will work out the actual
design from pieces you have seen, whether in photographs or in
the flesh. After you have worked out the pattern and the colors,
you should make a full sized sketch of one unit; that is, one
full repeat of the design. With this sketch, you will be sure
of what you're going to make and it will also help you figure
the yarn correctly.
Most sashes and garters are woven of
sweater-weight knitting yarn that comes in hanks of a specified
number of yards, marked on the wrapper. Measure your sketch to
see how wide your project is to be, and multiply this by twenty-four
(since sweater-weight yarn will work out at about twenty-four
strands to the inch of width). If you are using finer yarn, you
may have to make a practice piece to determine the strand width
count. Next, decide on the length of the braided section and add
10% for the "take/up" or length you will lose by the
strands'/lateral movement in braiding. Then add extra length for
the fringes on either end and you have the total length. Using
your sketch, work out the number of strands required For each
color on the basis of twenty-four to the inch. Multiply this by
the overall length and you will know how much yarn of each color
la required. Then, it's off to the yarn shop.
Many Indians like Red Heart brand yarn,
and it does work up well. You should get wool yarn, as both cotton
and synthetics aren't very elastic. But you don't need to buy
an expensive wool yarn like Shetland or Argyle. Something from
Woolworth's will do very well.
Having your yarn, you are ready to set
it up for work. You must find two winding posts and set them the
proper distance apart; that is, the overall sash length you figured
out before. The winding posts must be two solid objects around
which you can wind yarn without slipping You might clamp two sticks
to the edge of a work table, or use two ladder-back chairs, or
anything else suitable. Tie an end of yarn to one poet and start
winding back and forth until you have enough strands of the first
color Although it sounds silly to mention It, don't forget that
each round trip between posts gives two strands. I have seen people
wind off yards of yarn without realizing they had counted only
one side. End at the first post, untie your original knot, tie
it to the other end and cut off the excess. Repeat for the other
colors. Don't worry about having the colors in proper sequence
yet.
 |
| Fig 2 Top: How to insert the head and bottom tie strings. Bottom: How the yarn is wound. |
After the yarn is all wound off and tied,
it must be set in order. At the second winding post (the one opposite
the knots), insert the head tie string as shown in Fig. 2. This
should be a piece of strong cord about two yards long. Then go
to the first winding post, untie the knots and cut all the yarn
loops open. Then tie a second heavy cord around this yarn bundle
as shown in Fig. 2. Next you have to find a convenient place to
set up the yarn bundle and work, Personally, I like to work with
the yarn at about a 45 degree angle as shown in Fig. 3. Others
prefer it more nearly vertical or horizontal.
 |
| Fig. 3 How to arrange the yarn bundle for working. |
With the yarn arranged comfortably, you
must insert the head stick. This may be a peeled willow shoot,
a piece of dowel, or something similar. It should be about three-eighths
inch in diameter and eight inches longer than the braiding will
be wide. Lift up one strand of the color that goes in the center,
measure down from the upper tie a distance equal to the fringe
of one end, and loop this strand around the head stick. Continue
looping the center color strands around the stick and then check
the distance again.
 |
| Fig. 4 How to loop strands around the head |
Fig. 4 shows how these loops are made.
Continue looping the rest of the strands onto the head stick,
working alternately on both sides, and arranging the colors in
proper order. When all are in place, be sure the head stick is
square, and push the strands tightly together.
Finally, check the tension of the yarn
bundle Each strand should be taut, so that it does not sag, but
not tight. You should be able to raise or lower any strand several
inches without difficulty. Now, you're ready to begin braiding.
At this point, let me ask a favor. Finger
weaving is great fun, and the whole point of these articles is
to let you in on the enjoyment But, almost everyone who wants
to learn the process is thinking of making an arrow sash. The
arrow process isn't easy at first and you will have more luck
with it if you do some practicing with the basic method first.
Let me urge you to do one or two pieces in the basic chevron pattern
in order to get the feel of the technique before going on to the
more complicated patterns. I've seen enthusiastic people insist
on beginning with an arrow design make a mess of it, and give
up. This is like learning to drive a diesel truck - too much for
the first lesson.
First, then, you should try a single
band of plain braiding. With your yarn in order, pick up an edge
strand, pull it loose from the bottom tie, and simply weave it
through the rest, going alternately over and under. As it comes
out at the other edge, wrap it several times around the head stick.
Then go back to the starting point, pick out the next edge strand
and do the same. This time, be sure you've alternated with the
course above; that is, you are now going over the strands you
went under before and vice versa. At the end, unwrap the first
working strand from the head stick, and turn it over the second
working strand. The first strand must re-enter the work in proper
alternation also - if the second working strand went under the
last taut strand, the first working strand must go under
it as it re-enters the yarn bundle. Wrap the second working strand
around the head stick and tuck the first into the bottom tie.
|
| Fig. 5 The single band braiding process. In actual practice, the strands are tight together. Here and in the following figure, they have been opened up for clarity. |
Fig. 5. diagrams how this basic weave
should look. Just continue the process above, picking up each
new working strands at the same edge and putting each old working
strand back into the bundle properly, and in a little while, you'll
see a pattern forming. Because you are taking up yarn from one
side and replacing it on the other, your pattern will have diagonal
stripes as in Fig. 1, right.
This single band braiding is very easy.
The only problem is making sure the strands alternate correctly.
If you do get one strand going the wrong way, your mistake cannot
be righted two or three courses later and will only get worse.
If you do make a mistake, you must go back and straighten it out.
The next step is a band of double-band
braiding - the kind that will make chevron designs. Now you must
work with an even number of strands, since the work begins from
the center and each half must have the same number of strands.
Find the center point and pick up the strand on one side of it
- either side. Weave this strand through the opposite side, going
over and under and so on until you wrap the strand around the
head stick. Then, turn the head stick 180 degrees. The weaving
you just did will now be opposite its original place. Take the
strand that was on the other side of the first center (It will
now be in the same position as the first one you picked up) and
weave it through the side opposite it, being sure to pass it under
the first taught strand.
 |
| Fig. 6 A, First half of the first course. B, Second half of the first course. Note that the work has been reserved. C, First half of the second course. The work has been reversed again. |
Fig. 6 shows how this looks. I've made
one side dark and one light to clarify the operation. Turn the
head stick back to its original position, pick up the next center
strand from the first side and weave it through the second side;
that is, this third working strand goes along Just below the first
one you did. The fourth will go below the second, and so on. By
the way, each crossing of a bent with one or more working strands
is called a course of weaving. In this case, working strands 1
and 2 are a course since together they crossed the whole band.
After the third working strand is in place, the first Is turned
over it and back into the yarn bundle as before. Again, you must
be very careful to set a proper alternation of taut strands as
you go. From that point, the process goes on weaving in first
one side and then the other of each course. After you have done
several courses, untie the bottom string and slip all the loose
ends back into the yarn bundle.
When you stop work for the evening, it
is necessary to hold the last row of weaving tight. For this,
you make a center bar which can be a stick about one inch in diameter
and spilt lengthwise in two, or it could be two flat sticks of
the same size. Place the halves of the center bar over the working
edge and clump them together firmly with string or rubber bands.
Then untie both ends of the work, roll it up, and it will hold
itself securely until you're ready to work some more.
 |
| Fig. 7 How to make the turning stitches. |
When you have finished your piece of
braiding, insert a row of twining stitches at both ends to keep
it from unraveling. Fig. 7 shows how these stitches are done.
You may use a short piece of yarn, double it around one edge of
the sash, twine, and tie at the other edge. You may also use two
long pieces and let them add to the fringes at both sides. Some
people prefer to do the twining stitches at the upper end right
after inserting the head stick. Whether you do or not, be sure
to put them in both ends before releasing the tension on the taut
strands. With twining in place, untie the yarn and cut open the
loops at the upper end.
 |
| Fig. 8 Chevron sash with striped designs. |
The basic process makes chevron-like
designs. You can vary these according to the colors you choose
and by varying the size of the chevrons. For example, one chevron
might be ten strand wide, another six, and so on. You may also
make chevrons half one color and halt a second. To do this, just
set up an equal number of the two colors exactly opposite each
other on the head stick. The colors will alternate as you braid,
so that if you started with color A on the left, if will come
out on the right next time, then buck to the left. etc. You may
also vary chevrons with striping. Here you set up strands of two
colors In adjacent pane. Suppose you wanted a striped chevron
eight strands wide. In each half of the work, you would arrange
eight strands of the two colors thus: ABABABAB, making sure the
same color was nearest the center on both sides. As you work all
of color A will show on the surface in one course and all of color
B the next time. Fig. 8 shows how this striping looks.
 |
| Fig. 9 Sauk & Fox plain-face sash. Note the checkerboard appearance caused by letting the working strands show. Photo courtesy Museum of the American Indian. |
The preceding directions make what is
called a warp-face braid, which means that the working strands
hardly ever show on the surface This is caused by pushing the
strands closely together on the head stick before braiding and
by keeping the yarn bundle taut. There is another kind of plain
finger weaving in which the working strands do appear on the surface
and the work resembles Monk's cloth woven diagonally. This is
the process used to made the Iroquois sashes and the beaded edges
of Osage arrow sashes.
Fig. 9 shows an example of this plain
face braiding. To do this kind of finger weaving, space out the
strands on the head stick so they just touch and no more, and
loosen up the tension on the yarn bundle so the strands hang a
little slack. As you work, push each working strand up against
the preceding one as tightly as you can. This plain-face braiding
is harder to master than the warp-face variety. Tension is the
problem, and you will have to practice a bit to get the feel of
lt. In the next article, we will take up the arrow pattern. Again,
let me urge you to practice the basic process and familiarize
yourself with it before attacking the more involved arrow designs.
 |  |
| How to interweave adjacent bands. The dotted arrow shows the edge strand as wrapped around the head stick before it is returned to the yarn bundle. | How to interlock adjoining bands, so as to keep the background colors separate. |
Complete Index to Articles in 19th Century Seminole Mens Clothing

|
Text and Graphics
© 1994 - Tara Prindle unless otherwise cited. |