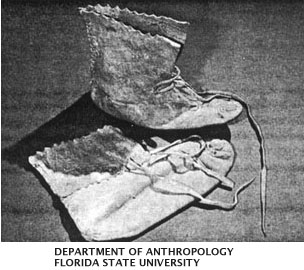
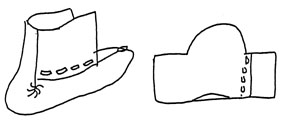
Moccasins
| Creek / Seminole Moccasins in 19th Century Seminole Men`s Clothing
|
|
Moccasins
| Creek / Seminole Moccasins in 19th Century Seminole Men`s Clothing
|
Notes from a G. Darry Wood demonstration of the Creek/Seminole method explained to him by Billy Bowlegs III.
Materials needed:
| - Tanned undyed buckskin | - sharp scissors |
| - awl | - file |
| - colored chalk or hardwood charcoal | - brown paper (shopping bag is fine) |
 The moccasins were always made from tanned deerskin, never cowhide. Braintanned is best. Commercial, or chrometanned, is adequate, but it must be deerskin. Tanned cowhide, however pliable, is inappropriate. Commercial skins come in white and dyed. White is more common and more natural. Commercial skins have a smooth "outer" side and a rough "flesh" side. Which side to use is optional: the smooth side is a little more water resistant; the rough side approximates the look of braintanned. (You could put the smooth side out on your moccasins and roughen the surface slightly with 80 grit wood sandpaper.)
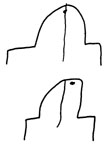
The moccasin pattern MUST be cut with the grain of the buckskin (Fig. A). This is no place to try to conserve buckskin. The thongs must also be cut along the grain of the buckskin. This is so they will be as strong as possible, and not likely to stretch. Cutting thongs by going around and around the-edge of a scrap piece will not achieve this.
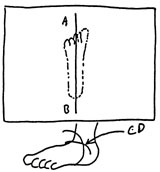
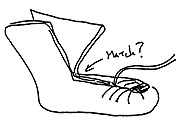
 Outline the foot on brown paper (a cut open grocery bag is fine.) Be standing on the foot when you outline it so it splays out like normal. Draw a line down the center of your outline.
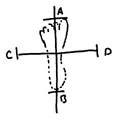
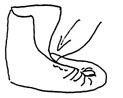
With a scrap thong, measure the circumference of the foot at its thickest part, just in front of the ankle. In most people, this circumference (C-D) is pretty much the same as the length of their foot (A-B). Mark the center line (A-B) at its middle, and use your thong to measure a line (C-D) at right angles to it at that point.
Now, mark the outer dimensions of your pattern: Mark a point two fingers' width in front of the big toe. Sometimes this can be as wide as three fingers, but rarely. Using this extra length, make an even curve around the front of the foot to line C-D. On the sides, add a width of four fingers (or more) outside both ends of line C-D. Mark this added width with lines parallel to line A-B.
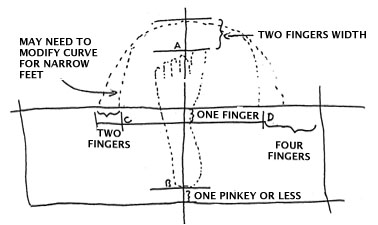
Behind the heel, add a width 1 pinkie finger or less (depending on how much you stretched the buckskin when tracing the pattern onto it). Extend this line, parallel to C-D, out to your new wide w1dths.
Add a width o� about one finger, 1/2" to 1", ln front of line C-D, and extend this out to your new wide widths. Then, complete the rough outline of the pattern.
 Option: The pattern could have a scallop at the base of the heel. This scallop is about 4" long, but may be no more than 1/2" deep. Some were made with a slightly deeper, but much longer, scallop that went the whole length of the back.
 Option: You may want to cut a thin wedge out of the front straight sides, back up to the C-D line or even further. (Mr. Wood recommends the curvature of a nickel.) Cut from that. point to the cuter corners. This will help these edges overlap when they're wrapped around the front of the ankle on the completed moccasins.
 Option: The Seminoles made two identical moccasins and left it to time and wear to shape them into "left" and "right." You may want to make yours "left" and "right" to start with. If so, you need to adjust the toe by taking away a little on the side of the little toes, and adding just about the same amount to the side with the big toe.
Cut out the paper pattern. Test wrap it around the foot, making sure that the [aside corners {where the nickel was measured) overlap slightly without being too tight. If they fit right, you're ready to use the paper pattern to mark your buckskin. Use chalk in a color that will show up on it, or charcoal. Never mark the skin with a pen. When marking out the pattern, the skin should be gently stretched lengthwise.
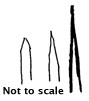
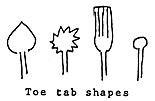
 Cut a thong about a foot long with a tab on the end. This tab can be as small as a fingernail or as big as a quarter. It can have a wide variety of shapes, and be cut longer if you intend to fringe it later on. The thong should be very narrow, perhaps no wider than the skin is thick although twice as wide as thick is OK.
Test this thong by pulling on it very firmly, with at least forty pounds. Better to have it break now ln your hands than later on In the moccasin during lacing!
Put a fine taper about 1/2 inch long on the end of the thong, coming out to a fine point. Use a little spit to soften the buckskin so you can twist it out. Then, pull this point against beeswax to keep it stiff.

A commercial awl usually has a blunt point. You need to file this down to a thin sharper point, almost as long as the point on your thong.
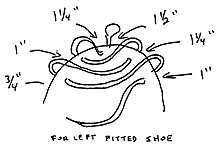
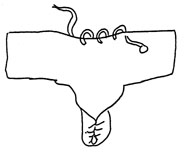
 If you have made a traditional pattern, your first hole will be in the center (1). If you made a "fitted" patter, your first hole will be about an inch off on the big side (2).
Where the holes are punched depends on the buckskin's thickness. In thick skin, the hole could be almost at the very edge. In thin skin, it may need to be 1/8" or more away from the edge, with the range in between depending on varying skin thickness.
You will pierce each hole with the awl and insert the thong one stitch at a time. Do not punch holes ahead of stitching.
 The tab goes in what will be the outside front of the moccasin. The next hole is about an inch and a quarter to the other side and, again, the thong comes
 in from the outside. Then, pull the two holes against each other on the thong VERY TIGHTLY . You may need to guide the skin's crease/pleat as it folds up under the thong. But, do PULL TIGHT. This is where your thong's strength is needed.
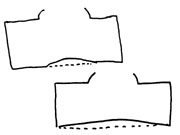
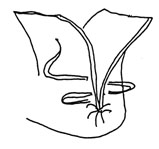
When done, the thong runs straight and the edges of the skin are folded snug against each other along its length. You will do this for three or four holes on either side of your starting hole, with each successive hole just a little closer to the one before it.
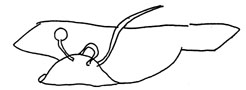
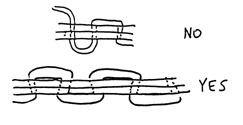
 Yours will never look like this laid open view, because you will have tightened each stitch very firmly when you made it. This drawing is just to show the sequence of the "baseball" stitch.
If you've made a "fitted" pattern, the diminishing spacing will have to be a little wider on the longer side to make up the difference.
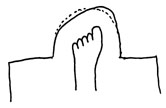
Having gathered in the toe, the next finished 1-1/2" to 2" will be in the same baseball stitch, but with holes spaced the same from each other. How far apart they are depends on how thick the skin is, with wider spacing on thick skin, and narrower spacing on thin, ranging from 1/2" to 1/4". Again, pull tight on each stitch so the thong winds up nearly straight and the skin's edge does the curling. Properly done, your stitching will NOT look like thin. This drawing is just to illustrate the stitching pattern. Done correctly, you will not be able to see the thong at all.
 While you stitch this section, pinch the two edges together to make sure the inner corners meet. If they are off a little, you should compensate by spacing the holes on one edge slightly farther apart than on the other edge to make up the difference. Stop when you get to the middle of the top of the foot, stop and go to the heel.
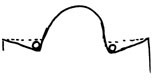
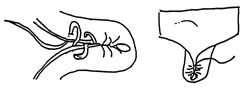
Cut another thong with a small round tab on the end, 1 to 2 feet in length. Pierce the first hole at one end of the shallow scallop. Insert the thong so the tab will wind up inside the completed moccasin.
 (Occasionally, a tab was not used, and the thong was merely tied off around this hole.) Put the next hole about 1/2" down the scallop and insert the thong from inside to outside again. Pull the leather tight against the tab on each stitch.
Your stitching will never look 11ke this, because you will be tightening on each stitch. This is just to show you the stitching pattern for these holes, 7 to 15 total, depending on their spacing, which depends on the thickness of the skin.
 Then, lace up the back with a running stitch, spacing the holes about 1/8" to l/4" apart, even less if the skin is very thin. Small stitches are best. Stop l/2" to 1" from the top and tie it off. You can trim off the unused thong or leave it long for wrapping (see below).
 You should not pierce the holes straight in. They should angle against each other, to retard the thong's loosening later on. Pull the skin and thong together snug, but not so tight that the skin puckers.
At this point, try the moccasin on. Do you need to take it apart and make any adjustments now? It's real easy to re-cut an edge and re-pierce a new series of stitches.
Finish the front with a running stitch the same as you finished the back with. Holes are 1/4" apart, less with thin skin, and punched at angles to each other, same as in the back. Better made Seminole moccasins had very small running stitches on both the back and front. Let the thickness of the skin be your guide. The thong is pulled snug on the thong, but not so tight that the leather puckers.
 Where you tie off this running stitch is a matter of choice. Close to the ankle keeps dirt out, but makes it harder to get the moccasin on and off. Away from the ankle makes doing that easier, but allows more dirt to get in, too.
After you tie it off, you can trim the thong close or, more commonly, leave a couple of inches loose.
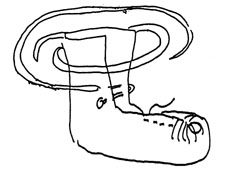
Cut a third thong, 1-1/2 to 3 feet long. This can have a tab, or you can plan to just tie it on. It is inserted as shown: low in front of the ankle. The high tops of the moccasin are wrapped around the ankle, and this thong goes around the ankle two or three times to tie it up.
Occasionally, the back thong ls left long, to be an additional tie around.
 Options:
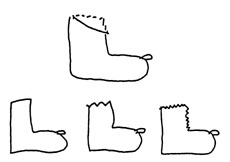
The top of the moccasin can be canted down at a slight angle.
The raw edges of the moccasin can be left straight, or sawtoothed with either big or small teeth. The sawtoothing can be on the top only, or on the top and front edges.
 If, by chance, you are short on deerskin, you could stitch on a side panel for the ankle "uppers."

The Seminoles are said to have sometimes rubbed pine resin into the soles to help make them more durable and water resistant. Another option is to stitch on a buckskin sole.
Return to the Introduction to Creek / Seminole Moccasins
Complete Index to Articles in 19th Century Seminole Mens Clothing

|
Text and Graphics
© 1994 - Tara Prindle unless otherwise cited. |