Cloth Leggings
| Cloth Leggings by Pete Thompson, Rick Obermeyer
in 19th Century Seminole Men`s Clothing
|
|
Cloth Leggings
| Cloth Leggings by Pete Thompson, Rick Obermeyer
in 19th Century Seminole Men`s Clothing
|
Materials needed:
| - heavy brown craft paper (grocery sack or wrapping paper), 24" by mid-thigh to floor | - straight pins, thread |
| - pencil or pen | - scissors and a small knife, both very sharp |
| - common sense, and attention to detail, and patience | - 1 yard 54" to 60" wide wool cloth |
| - 4 to 5 yds. 1" wide edging (single fold bias tape, or military edging, or silk/ satin ribbon | - 1-1/2 yds. 44" wide cotton cloth, if a lining is desired |
| - brass shoe buttons, or small military buttons | - 10/0 to 12/0 size white beads, if beadwork is desired |
Cloth leggings are more complicated to make than buckskin leggings, because they require sewing and more careful cutting. Don't expect to knock them out in a day, and adding beadwork can multiply the time needed to finish a pair.
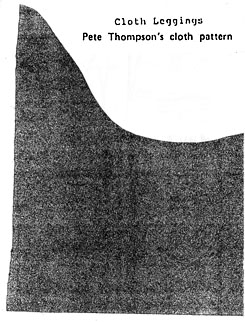
1) Have somebody help you pin brown craft paper around your leg, closing the paper down the front of the leg. The leggings could extend from mid thigh to just a couple of inches below the crotch. Continue along the top of the foot to your middle toe. The pattern should be snug, but not tight, and its paper crease should run down the back of the leg. Insert the pins from top to' bottom, and so they're aligned with the seam you're making. As you progress, the bottom of the pattern should come up off the floor about 1/2" to 1". DON'T WEAR SHOES DURING THIS FITTING!
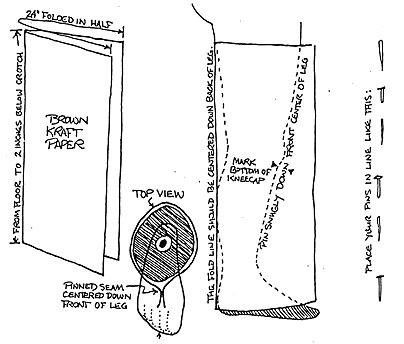
2) Undo the pins. The pinholes indicate a guideline for cutting the pattern, about one loch out away from them. If you have, shall we say, especially muscular legs, you may want to measure your upper thigh circumference while squatting, and increase the pattern's upper measurements accordingly. The better looking early 19th century leggings had brass buttons, but not every pair had them, and practically none did after the mid-nineteenth century. If you don't plan to add buttons, put in some extra room in the ankles. Change your guideline as needed, and maintain the extra one inch space outside the guideline as you cut out the adjusted pattern.

3) As a test at this point, pin the pattern back together, 1/2 inch in from your newly cut edge, The pins are positioned parallel to the edge, as shown. Slip your leg into the pattern and have your helper finish pinning all the way to the toe. If it's too tight anyplace, now is the time to make adjustments. If you plan to add buttons, don't worry about not being able to pull your foot back though at this point. The concern is if you can flex leg muscles without popping buttons or stitches on the finished leggings.
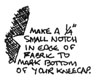
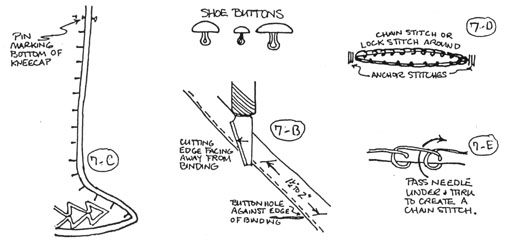
4) Once you're satisfied with the adjusted pattern, use it to cut both leggings (and liners, if desired). Cut a small 1/4 inch notch into the edge at the bottom of the kneecap.
If you're adding a liner, it would be a good idea to baste the bottom half of the liner cotton to the legging wool with long temporary stitches to avoid slippage problems as the edging is attached.
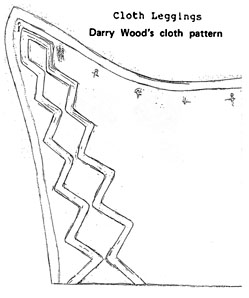
5) The edging to red leggings would be ,navy blue or black (Catlin's paintings of Osceola and Mlcanopy), or royal blue (McKenney-Hall engraving of Osceola), or white (McKenney-Hall engraving of Tukosee Mathla). The edging to the navy blue leggings collected by the Count de Pourtales ls black down the front and red (faded to pink?) around the bottom. There's a sketch of a 19th century Oklahoma Seminole that also indicates white edging around the foot of black or navy blue leggings. parry Wood made a very striking black/navy blue pair with yellow down the front and red around t he foot.
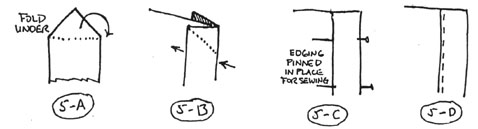
Cut a point into one end of your edging like the flap of an envelope. Fold down the triangular end on what will be the inside of the edging (see 5-A). Fold the ending ln half lengthwise (5-B), place at one legging top corner, and pin it into place. The pins should be one or two inches apart (5-C), being certain that the edging's crease fits snugly against the fabric's edge. Sewing should be done with small 1/8" running stitches (5-D) which are sure to penetrate ALL layers of fabric and edging. Of course, remove pins as you go, and re-pin a new section as you progress. Your stitches should be tight, but not so tight as to cause the fabric to gather. A slight pucker at each stitch is ideal. When you reach the notch marking the kneecap, leave a pin behind in the edging as a marker.
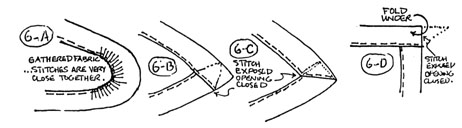
6) If the toe region is to be rounded, you'll need to gather the edging as you sew with very small stitches (6-A). If you prefer a pointed legging bottom, you'll need to fold, tuck, and stitch the excess material (6-B, 6-C).
Note that the edging could be loose at the toe, as seen ln the drawing of Billy Bowlegs on the cover.
When you've sewn all the way back to your starting point, clip the excess binding there into another triangular point, tuck it under (6-D), and stitch the exposed opening closed.
7) Once you've edged both leggings, it's time to cut buttonholes if you want to add buttons. While the size of the hole is dictated by the size of the button, it's very important not to make them too big. Most commonly used were brass shoe buttons 1/4" to 1/2" in diameter with a round or domed top. It's not impossible that small military buttons of the period could have been used. Use an X-Acto or other knife with a very fine sharp point. To determine the size of the cuts to make, puncture a piece of scrap material, and punch a button through this slot sideways just as you would when buttoning your shirt. Remember, you don't want the hole too big or the button will slip back through, or too small because you don't want to have to wrestle the button in.
According to Catlin's paintings, Osceola's buttonholes were on the right half of both his leggings. Micanopy's buttonholes were on the inside half of his leggings. The McKenney-Hall engraving of Osceola shows buttonholes on the inside halves of his leggings, as does the engraving of Tukosee Mathla.
Starting at the toe, use pins to mark 1-1/2" to 2" spaces for placing buttonholes. Stop 1" to 2" short of the kneecap marker. Placing the cutting edge away from the edging, puncture the fabric next to the edging (7-B) and at right angles to it. When done, you should have something similar to (7-C). Stitch the raw buttonhole edges with a chainstitch/ lockstitch/ whipstitch, and also anchoring each end with two or three tight overhand stitches (7-D).

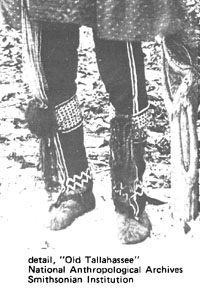
8) Now if the time to apply any beadwork. Beading along the inside and outside of the edging was very common, except that the inside of the edging wasn't beaded if buttons were put on. The 10/0 to 12/0 beads were always white, as were the appliqued beaded zigzags over the upper ankle area (see the detail from "Old Tallahassee", and the drawing of Billy Bowlegs on the cover of this workbook). Seminole motifs were very limited in style and color compared to much more elaborate Creek floral, geometric, and zoomorphic designs, some of which are illustrated here. For two-needle beadwork techniques, bead colors, and possible patterns, refer to the section on "Bandoliers and Pouches." Adding beadwork can take anywhere from days to months. Beadwork can be added last. but is it much easier to work on if it's added at this stage (8).

9) To complete assembly, fold the legging lengthwise, matching up the edges as well as possible. Using very strong thread, stitch together the section marked by the kneecap pins (where you can finally get rid of them), to a point about six inches from the legging's top. The stitching should be along the inner edge of the edging ribbon (9-A). Reinforce each end with extra stitches, and doublestitch back over the entire length. Mark button placement by going through the buttonholes to the matching legging side. Micanopy's leggings appear to have had the buttons attached to the INSIDE of the legging so that the edging of one side abutted against the edging of the other side, as in the sewn thigh portion. The engraving of Tukosee Mathla and the engraving and paintings of Osceola show one side's edging overlapping the other side, so the buttons must have been sewn on the OUTSIDE of the legging.
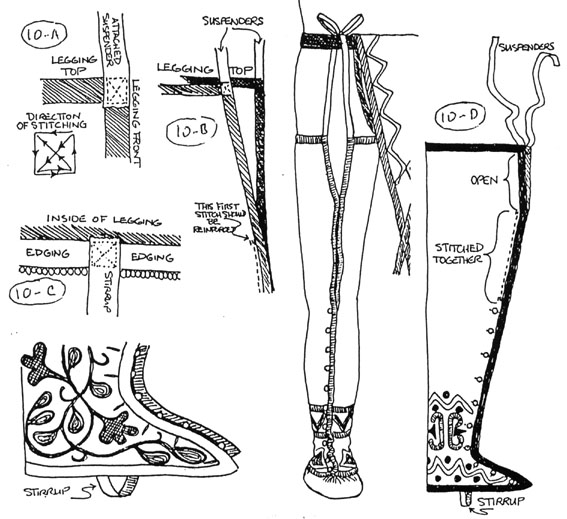
10) Attach another 1/2 yard edging to each top corner of the legging, being certain that it parallels the legging's front (10-A and 10-B). Penetrate all layers of fabric with stitching in a box pattern as shown. This maximum strength will be needed. These are the suspenders to tie the leggings into your breechcloth belt.
11) Many leggings had stirrups for comfortable wear. Put on the legging, attach it to your belt, and button at least the foot and ankle. Mark the highest part of your instep arch on the inside of the edging. Attach one end of leftover edging to that mark on the inside of the legging. Sometimes, a scrap of buckskin was used for this. Put the legging back on as before, pull the strap around the foot, and mark where it meets the other side of the legging. Remove the legging, turn it inside out, and stitch the stirrup where indicated on the legging's inside. Keep the stirrup from twisting! When you turn the legging right side out, it should look like (10-D).
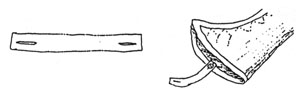
David Mott recommends stirrups because they keep his wool leggings from twisting when he wears them. He sews a pewter, bone, or mother of pearl button on the two places INSIDE the legging where the stirrup would attach. His stirrup is a 1/2" by 5" to 7" strip of buckskin with a longitudinal slit in each end that buttons on around the outside of the moccasin.
Bibliographic References for Leggings
Return to the Introduction on Seminole Leggings
Complete Index to Articles in 19th Century Seminole Mens Clothing

|
Text and Graphics
© 1994 - Tara Prindle unless otherwise cited. |