NativeTech: Native American Technology and Art

|
Porcupine Quillwork
Multiquill Plaiting Techniques
contributed by Nancy Fonicello
|
|
Strip of multiple quill plaiting used as
shoulder strips on an Upper Missouri style dress.
This type of work is extremely flexible and it is
easy to see why it was used so widely on clothing.
Note also the use of pony beads to compliment the quillwork.
|
Multiquill plaiting is
the term commonly used to describe a type of quillwork which has
the appearance of being "woven" with many quills at
once. It was a technique used extensively amongst the people of
the upper Missouri River in historic times and can be seen quite
clearly in the paintings of such artists as Karl Bodmer and Paul
Kane who traveled extensively in the west in the early 1800's.
This quillwork technique looks more complicated than it is - it
is actually one of the speediest to execute once the basic skills
are mastered. It uses the single band or zigzag technique, the
only difference being that many quills are used across the work
instead of just one or two at a time.
This page will
introduce you to the basics of the multiquill technique. I recommend
you review the techniques of zigzag
and single
band technique before you begin, as these are the two stitches
that you must know in order to do the multiquill technique.
 Multiquill plaited quillwork on a horse
headstall made by Nancy
Perhaps the most
difficult part of doing multiquill plaited quillwork is the beginning
and the ending! At first glance it looks as if you must work with
10 or 12 quills all at the same time, but in reality, you can
only sew down one quill at a time. The following instructions
will show you how to begin a piece of multiquill plaiting:
Multiquill plaited quillwork on a horse
headstall made by Nancy
Perhaps the most
difficult part of doing multiquill plaited quillwork is the beginning
and the ending! At first glance it looks as if you must work with
10 or 12 quills all at the same time, but in reality, you can
only sew down one quill at a time. The following instructions
will show you how to begin a piece of multiquill plaiting:
STEP ONE:
 First
determine how wide you want your strip to be - this will determine
for the most part the number of quills you will need in order
to fill the space. Obviously the wider your strip, the more quills
you will need.
First
determine how wide you want your strip to be - this will determine
for the most part the number of quills you will need in order
to fill the space. Obviously the wider your strip, the more quills
you will need.
When you are just
starting out, you may not want to make your strips any wider than
your longest quill. As you get more advanced, you will learn to
splice new quills in in the middle of the work, but for now, we
will just add quills on either edge.
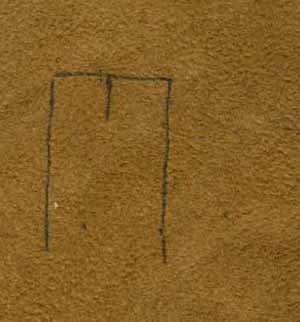
In my example I
have drawn an area about 1.25 inches wide. I know from experience
that this is a good size for a ten quill plait, so that is what
we will show.
As in previous
techniques, use a fine point pen to draw your lines on a piece
of soft brain tanned leather. Here I have drawn a short line in
the center of my strip to show where I will begin quilling.
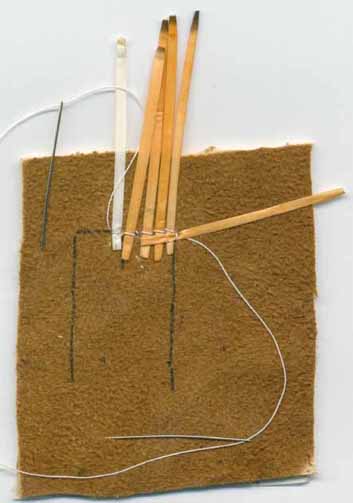
STEP TWO:

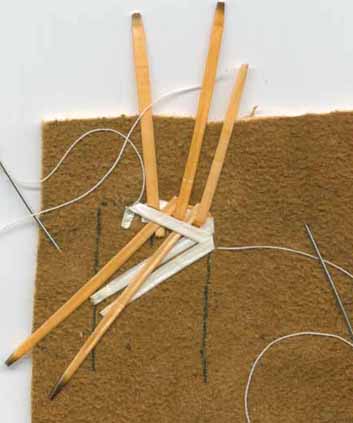
Find the center
of your strip and just to the right of it, make a loop with one
thread and stitch down a flattened quill. You might be wise to
select the longest quills you can find for this type of work -
the longer the quill, the fewer times you have to make a splice
as you cross the work! Don't fold the quills over just yet - leave
them sticking out away from the work as shown.
STEP THREE:

Now add quills
one at a time along the top edge which you have drawn your line
(working left to right), flattening the quills but leaving them
sticking straight out from the top of the work.
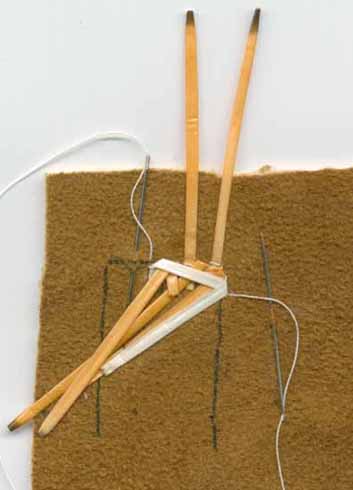
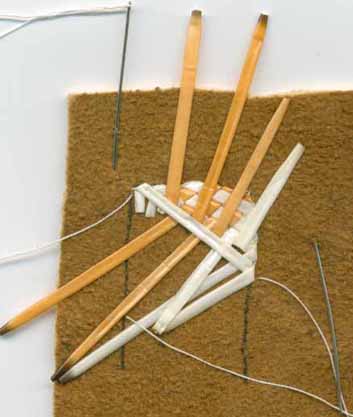
Continue until
you reach the right side of your strip (Here I have added 4 quills),
then add one more quill on the descending line, just as you did
across the top. Notice how this quill points at 90 degrees from
the previously added edge quills. This quill marks the beginning
of your quilled strip proper, and helps to make a nice clean corner.
STEP FOUR:
It gets a little
tricky here, so be patient! So far we have been working with just
one thread. Now it is time to add another needle and thread, this
time just to the left of the very first quill you stitched down.
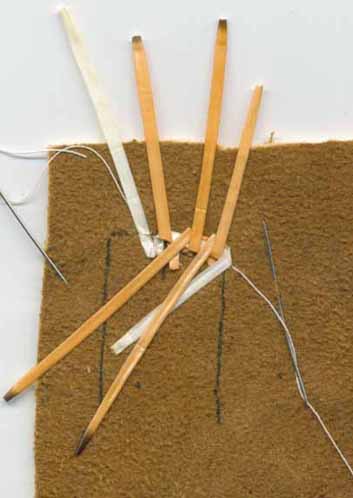
Don't be perturbed
that your work is starting to look like a porcupine on a bad hair
day! Once we start folding quills down, it will all make sense.
Add a new quill
just to the left of the other ones, keeping your stitches on the
line you drew before. Here I have used a white quill to illustrate
where I am adding a new quill. Normally these quills would be
all the same color as you begin a multiquill strip.
STEP FIVE:

Now the fun starts.
With your needles and threads safely out of the way, fold down
every other quill, starting just to the right of the new (white)
quill. If the quills have gotten stiff in the meantime, wetting
them slightly with your fingertips should help soften them up.
If you flattened the quills properly to start with, you shouldn't
have much of a problem folding them down now.
STEP SIX:
Fold the new quill
(the white one in this illustration) down over the orange quills
which you folded down in the previous stitch. Sew this new quill
down along the drawn line on the right side, just as you would
if you were doing the zig-zag stitch (i.e. the fold is toward
you). Notice that this quill is now covering the three orange
quills that you folded down in the previous step.
STEP SEVEN:
Here I have actually
shown two steps. First of all fold the two orange quills (that
you had left sticking up in Step Six) down over the top of the
white quill you just stitched down. Now lift up the quills that
were underneath that white quill, folding them up and out of the
way. With the quills alternating up and down, this step looks
very much like basket weaving.
Secondly, add another
quill just to the left of the newest one, just as you did before.
Here I am using another white one in my illustration.
STEP EIGHT:
Fold the new quill
down as before, over the top of the folded orange quills, stitching
it down along the right side line.
Congratulations!
Now you know how to do multiquill plaiting! But there are a few
more steps....
STEP NINE:
Continue adding
new quills to the left across the top of the strip, weaving the
other quills over and under with each stitch as shown.
STEP TEN:
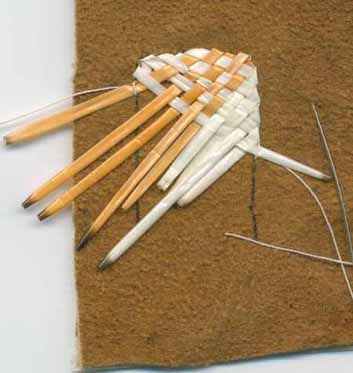 Two
more steps: when you reach the left corner of your strip, add
one more new quill going down the side. Here, the quill I am
talking about is the white one which sticking out on the right
side. Your left hand thread will be running perpendicular to the
top line now, although I have covered it over by folding the quill.
Two
more steps: when you reach the left corner of your strip, add
one more new quill going down the side. Here, the quill I am
talking about is the white one which sticking out on the right
side. Your left hand thread will be running perpendicular to the
top line now, although I have covered it over by folding the quill.
You are done splicing
in new quills and it is time to being plaiting! From here on out,
just sew down the next quill in the weave and continue as before.
Here, my next quill is the orange one. Note that this is the very
first quill you sewed down!
 From
here on out, completing your muliquill strip is just a matter
of adding new quills one at a time and weaving them as you go
with quills that are already in the work.
From
here on out, completing your muliquill strip is just a matter
of adding new quills one at a time and weaving them as you go
with quills that are already in the work.
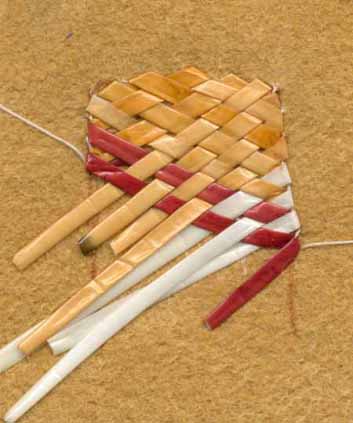
Splices for new
quills can be made at either side of the work. You can create
new patterns in your weave by introducing new colors from one
side or the other, or by doing mirror image strips side by side
to make diamonds and other patterns.
This is a picture
of a different quilled strip which I started. Notice how I have
changed the pattern by adding red quills from the left and white
quills from the right.
© 1997 -
Nancy Fonicello.
Porcupine Quillwork Bibliography and Books to Buy On-Line
Return to NativeTech's Main Porcupine Quillwork Menu
|

|
Text and Graphics
© 1994 -
Tara Prindle
unless otherwise cited.
|
