|
Tamarack Stick Goose Decoys
|
|
|
Tamarack Stick Goose Decoys
|

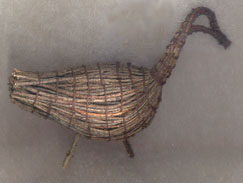
 Gather twigs from a stand of tamaracks. The twigs should not be so brittle that they snap in half with a little pressure. They should still be flexible. The twigs should be as long and narrow as possible as the size and length of your twigs will be reflected in your finished decoy (keep in mind that any twigs wider than 1/2 a centimeter in diameter at the base are probably too thick for your decoy, but you will need a couple thick twigs to form the feet of your decoy). This is just enough tamarack for a small decoy measuring about seven inches. If you are using recent fallen twigs for your decoy, you will need to soak them in warm water for several hours to a day. The older the twigs, the longer they need to soak to regain some of their flexibility.
|
 The twigs need to be stripped of the knobby spurs which the needles grew off of, and any smaller twigs growing off the main twig. If you are using fresh tamarack and not fallen branches, you will need to strip off the knobby spurs and the needles as well. This is acomplished by holding the narrow end of the twig with one hand and carefully with the other end running the twig between your fingers and thumbs.
|
 Once all of your twigs have been stripped of small twigs, needles, and spurs... sort them into piles. Just as a quillworker sorts thier quills acording to size, this will help you plan and carry out your decoy more easily. The size of the largest pile of twigs that you have will determine the size of your decoy. The length of the decoys body or neck should not be longer than your longest bunch of twigs.
|
 Always keeping the twigs moist and flexible, you start making making the decoy's body. This is acomplished by making an egg-shapped ball. You can use the smaller pieces and scraps which you stripped off your twigs.
|
 Having formed a ball of twigs, bind it tightly with thin cord, embroidery thread, or strong cotton string... even the imitiation sinew. Just be sure the material you are using is strong and will hold up to being tugged on. Wrap the ball until you have a distinct egg-shape. The wide end of the egg will be where the decoy's neck will be, and the narrow end of the decoy will be its tail.
|
 Now, you need to lay tamarack twigs around your body 'egg'. The number of twigs, depending of course, on the size of your decoy, of course. For a small decoy, choose about six twigs and (keeping them perfectly parallel - and alternating the thick and thin ends of the twigs across the row) wrap them over the wide end of the 'egg'... so that the ends of the twigs you are wrapping around stick out beyond the narrow end of the 'egg'. Hold the two ends of the twigs around the egg firmly with one hand, and gather up another set of six or so twigs with the other hand.
|
 Wrap this second set of twigs around the 'egg' similar to the first set, only make sure it is exactly perpendicular to the first set.
|
 This is the body 'egg' with the two sets of twigs laid over it. There should be only small gaps where you can see the 'egg' through the twigs. Tie the bundle of twigs you are holding *tightly* and cut the ends of the twigs off near the lashing so the ends come to a point.
|
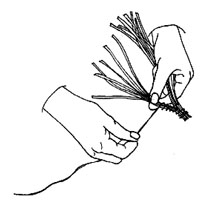
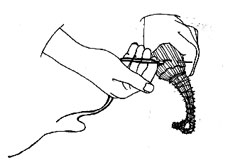
 Now it is time to make the head and neck of your decoy. For a small decoy, take about fifteen or so twigs and gather them by the thin ends of the twigs. Take your string and laying it parallel to the twigs and begin at the end of the twigs and wrap around the bundle tightly (wrapping over the end of your string. Wrap about a half an inch (this will form the very 'beak' of your goose).
|
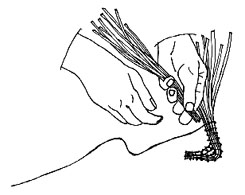
 Separate the bundle into two halves (one bundle slightly smaller than the other) and continue wrapping from the 'beak' down the *smaller bundle about an inch and a half to two inches (this is forming the lower jaw of your goose). Then wrap back up the 'jaw' to the 'beak' so that you form a series of x's with your thread.
|
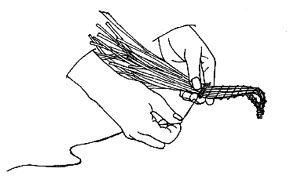
 Now from the 'beak' wrap around the second half of the split bundle of twigs (this is forming the top of the goose's head). As you are wrapping, you will need to bend the bundle of twigs so it has the proper arch to match the outline of a goose's head, wrap about two and a half inches, and eventually join it to the lower bundle of twigs wich forms the 'jaw'.
|
 While joining the bundle for the top of the goose's head with the bundle of the goose's 'jaw' you will need to bend the lower 'jaw' bundle... and be careful not to break the twigs. Now wrap around the joined bundles to form the goose's neck for about an inch.
|
 You don't want your decoy to have too skiny of a neck, so now its time to add in some additional twigs. Grasping a bundle of ten or so new twigs by the narrow tips, insert them into the *center* of your decoy's neck so they do not stick out. You may need to add another bundle of twigs if your goose's neck still seems to thin after a couple wraps with the string.
|
 Continue wrapping down the neck, and as you wrap the neck, keep in mind how a goose holds its head on its neck... try to bend the twigs to a graceful 'S' shape, even looking down or to the side... it takes alot of practice to get just the right expression of a goose. Wrap around the base of the neck in the same place several times (perhaps three inches down from the 'jaw' for a small decoy). Then wrap back up the neck, creating a series of X's with your string. Continue wraping over the head of your decoy (creating more X's) till you are back at the tip of the 'beak' of the decoy. Tie off the string with three or so half hitches and trim the excess string away.
|
 Now join the decoy's head to the body you set aside before. Spread the twigs sticking out from the neck into radiating spokes. Place the spokes over the body 'egg' so that the spokes from the neck lay parallel and/or inbetween the twigs already on the body. (pay attention to the postion of the head at this point, as it is difficult if not impossible to adjust after it is fastened on). Gather the ends of the spokes with your hand and hold them firmly in one hand (you can temporarily tie them with a string till you get to finishing the tail of your goose).
|
 Keeping all the twigs as neat and as parallel as you can, now begin to stitch around the decoy, securing the twigs to eachother and to the 'egg' they rest on. Using a standard 'back stitch' and a large tapestry needle, stich in even circles around the decoy's body. Hide the stitch under the twigs when you move to start stitching the next row, and keep your rows of stitches about an inch or so apart (closer together for smaller decoys, and a little further apart for larger decoys).
|
 Occasionally when you see a gap between the twigs, especially as you near the wider part of the body, you will need to insert new twigs by their narrow end between under the stitches and between existing twigs. Insert them far enough so that their ends are hidden and blended. Likewise, when you are stitching past the center of the body when the body starts to taper, you will need to trim selected twigs and cover over the ends by pressing together the twigs to either side of it. Continue stitching in concentric circles down the length of your decoy (dont make your body too long -- keep in mind where the 'egg' inside ends, and keep in mind what a goose looks like). If the ends of the twigs are exceptionally long as you near the tail, trim them a bit so you can gather them as close together as possible (trim them no closer than within two inches of the interior 'egg'), and don't trim them so much that you cant finish the last round of stitches! After your last stitch, pass the needle and thread through the tail, and that should hold the stitch rather than making a visible knot.
|
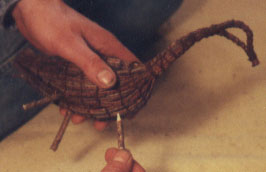 Now give your goose legs, using three short thick tamarack twigs/branches which have been sharpened to points on one end. Insert two sharpened twigs on the bottom 'just behind center' of your goose at a slight 'V' angle. And insert a third sharpened twig just below the chest of your goose. It takes a lot of practice to make a decoy look 'alive' so remember that the first time you make anything, it is a 'learning' piece (smiles).
|
Branches, Twigs & Roots Bibliography and Books to Buy On-Line

© 1994-2000 Tara Prindle.