|
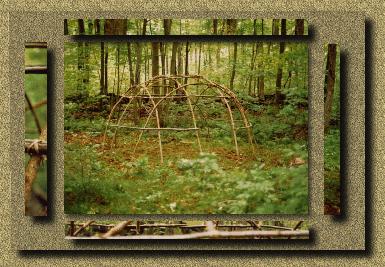
Wigwam Construction
|
|
|
Wigwam Construction
|
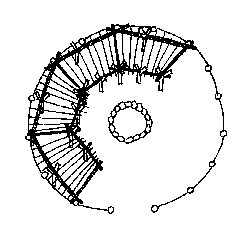
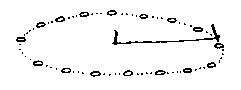 Select a level site for your wigwam. Be sure that the ground is not so soft that it will not hold the poles, and also that it does not have bedrock too close to the ground surface. Clear the area of any scrubby vegetation. Draw a circle in the dirt by finding the center point, driving in a stake. Connect a seven foot string to the stake and a small stick to the other end of the string. Draw a circle with a 14 foot diameter (seven foot string length - radius) by keeping the string taught and tracing around the circle with the stick.
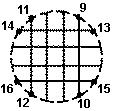
Mark 16 points around the circle (1-16). A good way to figure out the exact spacing between 16 upright poles around the circle is to use this formula: |
|
2 TT radius (in feet)
______________________ X 12 (inches/feet) # of poles 2 X 3.141 X 7 _______________ x 12 = 32.98 inches between the poles around the circle 16 |
 Make holes in the ground first with a wooden stake and hammer (even a crowbar). Holes should be at least 6 inches deep to a foot deep. Mark the holes with small sticks so you don’t ‘lose’ them.
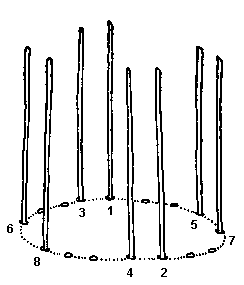
Gather some fresh flexible saplings (at least 25-30); their length depends on how big you want your wigwam to be, in this example 14 feet in diameter and 7 feet high. So your sapling poles should be about 12-15 feet long. Willow, birch, even sassafras saplings work well. The important thing is that the saplings should be no bigger around at the base than 2 inches, and shouldn’t taper over a 14 foot length to any less than 1 inch in diameter. The saplings should be straight and with few branches. If there are any branches, the branches need to be trimmed off flush with the sapling. It’s a good idea to strip all the bark off the saplings, and your wigwam frame will have a longer life-span. Cut points on the bases of the saplings so they go into the holes easily. |
 Note: you can ‘pre-bend’ the saplings by placing the base of the sapling between a tree base and a large rock… putting your body weight against the middle of the sapling, and listening carefully for any crackling sounds in the wood (which indicates ‘brash failure’ of the wood, a sign that the sapling is about to snap or split. If the sapling breaks, use another one.
|
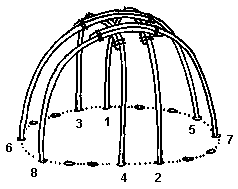
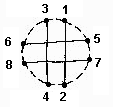 Plant the first set of eight poles numbered 1-8. Bend them over two at a time so they overlap about two to three feet. Following the diagram bend 1 to meet 2, 3 to meet 4, 5 to meet 6, and 7 to meet 8.
|
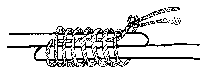 Lash the ends of each set of two poles together at two places, about three inches from each end using the method for lashing parallel branches. Traditionally the poles were lashed together with the inner bark of the basswood tree. If you do not have basswood in your area, you might try a commercial lashing like heavy jute or sisal twine
|
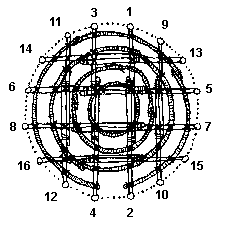
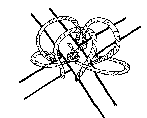 At the four places where the sets of poles cross each other perpendicularly, lash them with the method used for lashing perpendicular branches.
|
 Now place poles 9-16 in the holes remaining.
|
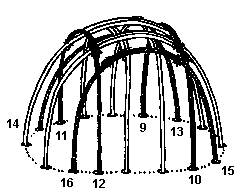 These are bent over, following the diagram, 9 to meet 10, 11 to meet 12, 13 to meet 14, and 15 to meet 16. Lash the overlaps in the same way that you lashed the first set of poles, and lash together *every* place where poles cross each other.
 |
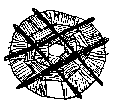
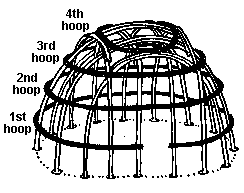  Using your remaining prepared saplings, you need to fasten hoops around the perimeter of your wigwam frame at three to four places. The hoops really make the structure sturdy. Start with the bottom hoop (about 2 ˝ feet up from the base). This first hoop will use two to three saplings to go all the way around, lash the hoop on making sure to leave a ‘gap’ for the door (entrance) to your wigwam. Keeping them about 2 feet apart, lash down the second, third (and fourth hoop near the top if your wigwam needs four hoops to make it sturdy). Your second and third hoops will probably need two saplings to go all the way around. Save your skinniest sapling for the top hoop as it has to make a pretty tight circle. Make sure every crossing of the poles and hoops is lashed.
|
 Now focus on any inside ‘furniture’ for your wigwam. You should have a central hearth (about three feet across, or a foot and a half in diameter), which heated the wigwam in cold weather, and was used for cooking in rainy weather. Dish out the hearth to a depth of about 6 inches in the center, creating a basin. Line the hearth with small cobbles or clay, put stones around the hearth to help contain the fire.
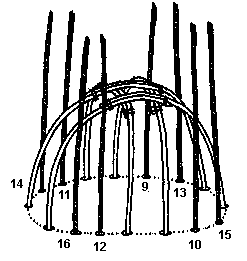
Usually sleeping platforms went at least half way around the wigwam. You probably want to use fresh sturdy hard wood branches for the platforms, such as oak, maple, or hickory. Begin by building the frame of the sleeping platform, as in the diagram, with a set of ‘Y’ poles (saplings with a Y branch at the top). The Y poles are set into the ground so that the sleeping platform is level with the first hoop (about 2 ˝ feet off the ground). Support the front of the platform with additional Y poles about three feet in from the walls of the wigwam. Build the frame of the sleeping platform according to the diagram, being sure to lash the frame securely to the ‘Y’ poles. Then lash 3 foot sticks to the platform structure using a heavy twine. There will be small gaps between the sticks at the perimeter of the platform (take care not to let the sticks project beyond the edge of the wigwam wall) but the sticks should be flush against each other on the interior side of the platform. |
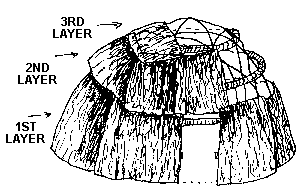 Now that the inside of your wigwam has been furnished, you need to cover the structure with bark sheets or cattail mats. Bark sheets were often used in the winter, while cattail mats were more often used in the summer. Elm, chestnut, ash, and hickory were often used for bark sheets… (check local foresters/lumber yards to see if there are any places they have recently cut, they usually discard the bark and often will let you strip some bark off the trees they cut). Start at the bottom, and shingle the bark sheets or cattail mats in three layers. If using mats, you can tie the mats to the second, third and fourth hoops… if you are using bark sheets, you can drill holes and lash pieces to the hoops, but often the weight of the bark alone will hold them in place (sometimes weighting them with rocks here and there. Make sure you leave an opening for the door in the bottom layer and an opening for the smoke hole at the very top.
|
  Once your covering is in place, you can place four more bent poles over the bark or mat covering to hold all the shingles in place. If you don’t have the materials or manpower to make a cattail or bark covering for the wigwam, use heavy canvas. Canvas was used to cover wigwams starting in the late 1700s. Use a sheet of birch or elm bark, or a cattail mat, to cover the smoke hole (propped up on one side against prevailing winds or rain), and use a cattail mat or hide to cover the door.
Often, fine woven bullrush mats (twined and dyed in black and red) lined the interior walls of wigwams, but that… is another lesson! |

© 1994-2000 Tara Prindle.