The Seminole Longshirt
| by M. E. (Pete) Thompson
in 19th Century Seminole Mens Clothing
PATTERN & CONSTRUCTION |
|
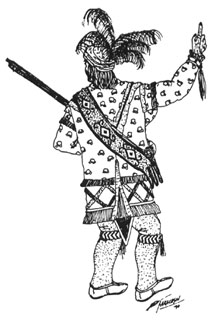
The Seminole Longshirt
| by M. E. (Pete) Thompson
in 19th Century Seminole Mens Clothing
PATTERN & CONSTRUCTION |
FABRICS
Some McKenney-Hall portraits seem to indicate wool or strouding could have been used, from the ways the fabric hangs and folds. The Museum of the American Indian, Heye Foundation, has a buckskin example, and also one made of "chintz. n But, a re-enactor should prefer the commonly used cotton, especially if he can locate 100% cotton. (The Joanne Fabrics chain of stores carries a wide variety of 100% cotton cloth in old-style prints at a very good price.) They are made from a variety of geometric or floral prints, paisleys ginghams, calicos, and stripes. If you decide to use plaids or ginghams, try to located woven and not printed designs. Calicos, stripes, and fine prints were used more before the 1890's, and solids used more regularly after that. A pre-1860 re-enactor has an even wider freedom of choice in large paisleys wide stripes and bright calicos.
Most longshirts in museums seem to be red, black, or dark blue, but other colors are noted. Many good fixed dye colors weren't perfected until the late 19th century by the Germans. We don't yet know of a resource that outlines a history of color dyes to know what colors were readily available in the early 19th century.
If the Seminoles can be said to have any color preferences, those would probably be reds and blues. But, don't consider yourself limited to those. Keep in mind that all known written references to old-style Seminole leggings describe them as red (although we know there were dark blue ones as well.) The apex of the completed outfit, a beaded bandolier and pouch, is always made with red or blue or black wool strouding, but red wool seems to have been preferred to the others by two to one (Most, 1990). The re-enactor should consider choosing another color than red for his longshirt unless he really wants to be all in that color.
The prints tend to have medium to dark color backgrounds, but light colors are not unusual. The cape can be a different print from the body but is usually at least the same base color.
The ruffles that contrast instead of match with the cape and body fabric are usually a solid color, a very fine print, or a very narrow pin stripe. If a stripe is used, the lines need to be at right angles to the edge of the ruffle, not running lengthwise parallel to the edge. Incidentally, ruffles were almost never hemmed. They were left cut, and in a few early examples, threads were pulled loose to get a short fringe effect.
|
A: Body B: Sleeve C: Cape |
D: Collar E: Cuff F: Reinforcer |
RS: Ruffle in same fabric as body and sleeves RC: Ruffle in contrasting fabric Not shown: optional shoulder, cuff, second hip, and diagonal ruffles. |
|
(1) Distance from collar bone to thigh (exact length is personal preference) (2) 1/2 chest measurement plus four inches (3) Shoulder joint to wrist (modern option: to just short of elbow) (4) 1-1/2 times flexed bicep circumference, plus a 10" square gusset at one end of sleeve (Option: can be a separate piece sewn on) IMPORTANT: Be sure your measurements include 1/2 inch for 1/9" seam allowance. | ||

Notice that the ruffle that goes up one side and down the other of the tail slit is shown to be a single piece of cloth, which was always the case. The instructions show a rectangular piece. The tail slit ruffles were also often tapered at both ends:

Non-directional fabric layout:
Directional patterned print or weave fabric layout (SUGGESTED):
 A. Fold the sleeves wrong side out as shown below, stitching from a to b. Be certain that the gusset is folded exactly as shown before stitching, and that you stitch only the outside edges together. Your finished sleeve should look like the one I below. Turn right side out when finished.
Record this measurement once sewing is completed. Then subtract two inches.
|
 B. Cut the cuffs 3 longer than the loose wrist circumference. The piece should be 2" to 9" wide. Fold lengthwise, right sides facing and sew each end with a 1/4" hem. Turn right side out and flatten, either on the knee or with an iron. Stitch all the way around 1/8" from the edge. Sew the two ends together with an overcast stitch.
Insert the end of the sleeve through the cuff so that the raw edges of the sleeves and the cuffs meet. Gather the sleeve with small pleats and pin into place. (See Appendix *2* PLEATS) Sew down with a tight stitch, either overcast or running. Turn the cuffs right side out.
C. Fold each body panel in half lengthwise. At the OPPOSITE END OF THE TAIL SLIT, measure in 2" FROM THE END.
Using the measurement taken from the gusset end of the sleeve (less 2"), angle a line the same length to the edge of the fold using a straight edge.
Mark and cut through both layers of fabric. When opened, you should have a large V-shaped opening in each panel, as below:
TAIL SLIT
The instructions show a cut for a vent in the back, called a "tail slit." The tail slit is always there after the 1830's. How wide it is, and how deep it is cut in depends on period and on personal choice. There are even tail slits left open for which no specific cuts were made. The cut for a tail slit could therefore be from 0" to 1" on each side, and its height Can vary from 4" to 8" into the body of the longshirt. On a contemporary example, seen offered for sale at the Dania Reservation in 1989, the tail slit was open all the way up the back as high as the shoulder blades!
Begin sewing body panels (A) together from the tail slit (a) to the top (b). Using a simple rolled hem, hem the edges that make up the front opening. Before proceeding finish the bottom and sides with whatever applique and ruffles you have chosen (see "FINISHING").
D. The collar is, in reality, nothing more than a neck spacer. It's a double piece of fabric about 1" or 2" wide and about 3" long when finished. Simply double over the fabric wrong side out, and sew up each end using an overcast stitch. Turn right side out, smooth out the sewn ends, and press flat. Set it aside for now
E. (See Appendix *1* CAPES) Briefly, the cape is either an equilateral or an isosceles triangle, depending on period or preference. It was usually modified at the base of the triangle to resemble a faceted gemstone seen on edge, as below. It is more or less shoulder wide, depending on period and preference, and edged with ruffles and straight applique. The cape should be completely finished before proceeding {See "FINISHING").
| F. Center the neck spacer over the center seam of the completed body at the top edge, open side edge to edge with the body top, midway between sleeve openings. Be certain that it's attached and on the wrong side of the fabric and hangs down. |
|
| G. Next, place the finished cape directly over the spacer as shown below. Be certain that the finished side of the cape faces against the wrong side of the body. Sew from point A to B with a tight overcast stitch (about 1/8" apart). |
|
 H. Once the cape and neck spacer are attached, lift the cape out of the way as shown below. Match each side of the front to the edge of the neck spacer, and pin at that point to hold in place. It will be necessary to gather each side to equal the length between the neck spacer and the shoulder edge (A to B, and A' to B'). (If you have decided on shoulder ruffles, insert them at this time.) Pin into place as needed, and sew together. If there are no shoulder ruffles, use a tight overcast stitch the same way you sewed the cape and neck spacer to the I body. If there are ruffles, you will need to use a tight running stitch. As you sew, you will be making several small pleated folds in the front body piece to gather it slightly. (See Appendix *2* PLEATS)
Turn the body of the shirt inside out. Make certain the sleeves are kept right side out.
Match the apex of the gusset with the bottom of the sleeve opening. If you want a shoulder ruff, insert it at this time. Pin the sleeve to the body working up each side until you encounter the gathering.
Adjust the pleats until the gathered portion of the sleeve and the opening are roughly equal. Insert pin at the front-back seam of the body panels (P). The center mark you're earlier should be on that seam. Once you're satisfied all is okay, pin it into place, continuing until the sleeve is pinned all around. Sew the sleeve onto the body using an overcast stitch at least Ľ" from the edge, with stitches about 1/8" apart. Pull them tight, but not enough to cause the seen you’re stitching to buckle. Repeat the process on the next sleeve, then try it on for fit.
I. The reinforcer can be the same material or even a darker contrasting piece. Sew it on top of the shoulder seam from the point where the cape attaches out to the sleeve. It is stitched on both edges, which are usually turned under, but can also be left raw. There are a couple of examples in which a contrasting piece is so wide that the raw edges make narrow ruffles.
Go to Longshirt Appendices & References
Complete Index to Articles in 19th Century Seminole Mens Clothing

|
Text and Graphics
© 1994 - Tara Prindle unless otherwise cited. |